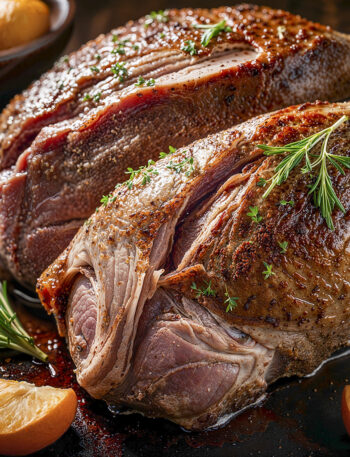
Dreaming of perfectly cooked food from your grill? You know, the kind with that amazing sear on the outside, while staying incredibly juicy and tender inside? If you sometimes struggle with undercooked centers or burnt exteriors, I’ve got a technique that will completely change your grilling game: meet two-zone grilling!
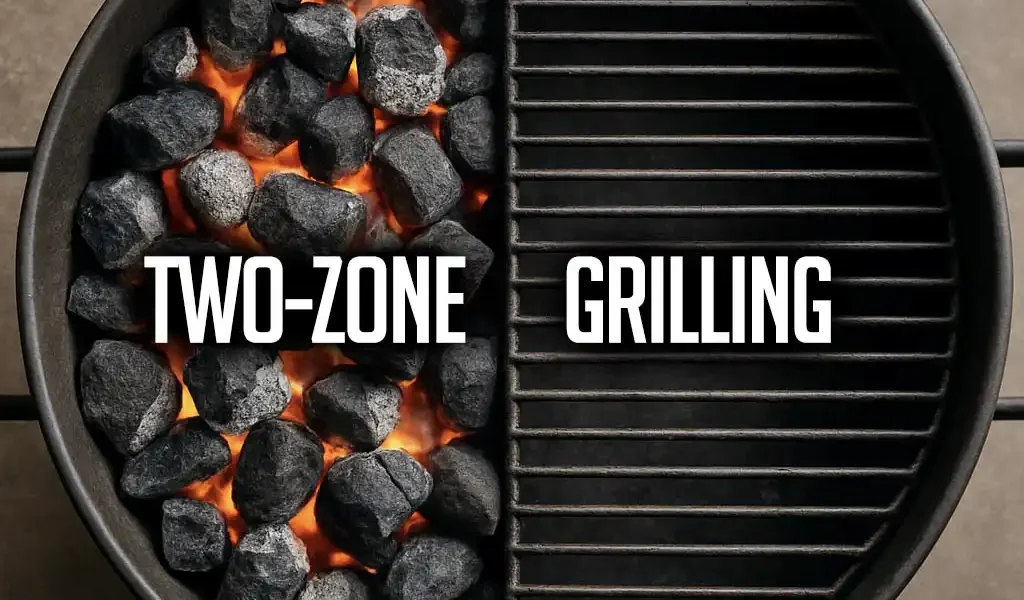
What Exactly is Two-Zone Grilling?
It’s a simple but brilliant principle: you divide your grill into two areas with different temperatures:
- Direct Heat Zone: This is where the heat source (coals, briquettes, or gas burners) is directly under the grate. It’s perfect for quick searing, browning, and getting those beautiful grill marks we all love.
- Indirect Heat Zone: There’s no direct heat source under this area. Food here cooks more gently from the hot air circulating inside the grill – similar to how an oven works.
This simple setup gives you excellent control over the entire cooking process. As one BBQ instructor aptly put it, “Setting up two zones on your grill is like having both a stovetop and an oven in your backyard.”
Why Two-Zone Grilling Will Up Your Skills
Picture this: you’re hosting a backyard barbecue, guests are chatting, getting hungrier by the minute. Without knowing the two-zone method, you might find yourself nervously checking if the chicken is still raw inside, or desperately trying to stop the steaks from turning into shoe leather.
Experienced grill masters almost never fire up their equipment without setting up different heat zones. It’s not just a preference – it’s the key to consistent, great results. Top BBQ champions worldwide use this technique for everything from holiday turkeys to award-winning ribs. Why? Because it just works.
The Science Behind It: How Heat Transforms Food
To really appreciate two-zone grilling, it helps to understand what’s happening to food when it heats up. Temperature control is crucial because different components in food react differently at various heat levels. This isn’t fussy stuff – it’s basic food chemistry that decides whether your steak is a juicy masterpiece or a tough chew toy.
Proteins: Precise Changes at Different Temperatures
Proteins are the main building blocks of meat. Heat causes them to go through major structural changes called denaturation. Here’s a rough guide:
- At 104-122°F (40-50°C), proteins start to unwind from their natural shape.
- At 126-131°F (52-55°C), myoglobin (which makes meat red) denatures, changing the color from red to pink.
- At 140-149°F (60-65°C), most proteins tighten up significantly, squeezing out moisture (water).
- Collagen slowly starts turning into gelatin around 158-167°F (70-75°C).
- Above 176°F (80°C), most proteins are fully denatured, making the meat much tougher.
The higher the temperature, the more the proteins denature and the more moisture is lost – that’s why it’s so easy to dry out meat. And this is exactly where two-zone grilling comes to the rescue: the indirect zone lets you gently bring the meat up to a safe internal temperature that results in great flavor, without tightening those proteins so much that the meat becomes tough and dry.
Collagen: The Secret to Melt-in-Your-Mouth Meats
Another fascinating aspect is the transformation of collagen – the connective tissue protein that makes certain cuts naturally tough. Turning tough collagen into luscious gelatin depends on both temperature and time:
- Below 140°F (60°C), collagen stays tough.
- Around 140-149°F (60-65°C), it slowly starts to break down, but it’s a very gradual process.
- Between 158-176°F (70-80°C), the transformation into gelatin speeds up.
- The ideal range for this conversion is 176-194°F (80-90°C).
- Above 194°F (90°C), the risk of drying out the meat outweighs the benefits of further conversion.
Crucially, it’s not just about temperature; it takes time. Cuts rich in collagen (like beef chuck, ribs, pork shoulder) need many hours of low, slow cooking for the collagen to fully break down. Two-zone grilling is perfect for this: the indirect zone allows you to maintain a steady temperature around 225-275°F (107-135°C), ideal for that slow collagen transformation without drying out the outside of the meat.
Fats: From Solid Mass to Flavorful Liquid
Fat in meat isn’t uniform; different types melt at different points:
- Softer (unsaturated) fats start melting as low as 86-104°F (30-40°C).
- Most intramuscular fat melts between 104-131°F (40-55°C).
- Between 131-176°F (55-80°C), harder (saturated) fats melt and flavor compounds are released.
- Above 176°F (80°C), fat starts rendering (melting out) rapidly.
Melting fat does several important things: adds flavor and aroma, provides juiciness, carries fat-soluble flavor compounds, and affects the feeling of tenderness in your mouth. Getting the temperature right is key: too low, fat stays solid and waxy; too high, too much renders out, leaving the meat dry. That precious intramuscular fat (marbling) adds tons of flavor and juiciness but is easily lost if the temperature gets too high.
Sugars and the Maillard Reaction: Where Rich Flavors Come From
Meat also contains natural sugars that caramelize at higher temperatures:
- Around 230-248°F (110-120°C), they begin to melt.
- Real caramelization, creating deep sweetness and complex flavors, starts around 302-320°F (150-160°C).
- It becomes intense between 320-356°F (160-180°C), developing rich caramel flavors and brown color.
- Above 356°F (180°C), sugars start to burn and taste bitter.
Separate from caramelization (though often happening at the same time) is the Maillard reaction. This is a reaction between amino acids and sugars that creates hundreds of different flavor and aroma compounds – it’s responsible for that savory, “meaty” flavor and the beautiful browning we crave. It requires temperatures above 284°F (140°C) and a relatively dry surface. That’s why patting meat dry before grilling is crucial for getting an amazing crust.
Why Water is the Enemy of a Good Sear
Many beginner grillers don’t realize that the biggest obstacle to perfect browning is excess moisture on the food’s surface. Why? Simple physics: as long as water is present on the surface, the temperature there can’t exceed the boiling point (212°F / 100°C), no matter how hot the grill is underneath. This is due to evaporative cooling – the evaporating water uses up a huge amount of heat energy.
Only when the surface is dry enough can its temperature quickly rise above the 284°F (140°C) threshold needed for an intense Maillard reaction. This is why wet marinades can hinder browning, and why patting meat dry with paper towels makes such a big difference in achieving that desired brown crust.
Using Butter and Other Additions for Better Flavor
So, what’s the best strategy for great flavor and browning?
- Thoroughly pat dry the meat before it goes on the grill.
- Start grilling without added fat (butter or oil) to let the surface heat up quickly for the Maillard reaction.
- Once the meat is nicely browned, start basting with heated, melted butter (heat it until it foams or clarifies). Keep basting as it finishes cooking.
- Add aromatics like rosemary, thyme, or crushed garlic to the butter for even more flavor.
Many experts also use cast iron skillets directly on the grill grate. This works brilliantly with two-zone grilling: preheat the skillet over direct heat, then sear your steaks in it while basting with hot butter. Cast iron holds and distributes heat incredibly well, promoting an ideal Maillard reaction.
Precise Temperature Management: The Key to Success
Mastering two-zone grilling isn’t just about arranging coals or setting burners – it’s primarily about the art of precise temperature control. Without it, even perfectly set up zones won’t work effectively.
Get Started Right: Calibrate Your Grill
Something often overlooked, but crucial, is calibrating your new grill. Before its first real cook, you should season it (if applicable) and do a few “dry runs” – heat it up empty a few times. This does two important things: first, it burns off any manufacturing residues or chemicals that could affect taste. Second, it helps you learn how your specific grill behaves: where its “hot spots” are, how quickly it heats up, and how well it holds temperature. It’s worth dedicating 2-3 sessions just to observing how the temp rises in different zones, how long it stays steady, how much heat is lost when opening the lid, and how different vent settings affect the temperature.
Your Independent Thermometer: Your Best Friend
Seriously: do not trust the thermometer built into your grill lid. You absolutely need to invest in a good external digital thermometer (ideally two). It’s one of the most overlooked keys to successful grilling. Lid thermometers are notoriously inaccurate – they can easily be off by 50°F (28°C) or more! Plus, they measure the air temperature way up in the dome, not down at the grate level where your food actually is. And they’re often not properly calibrated anyway.
A good digital thermometer is essential. Ideally, have two types: an instant-read thermometer for quick internal temperature checks, and a probe thermometer (preferably wireless with multiple probes) for continuously monitoring the grill’s air temperature near your food.
Weather Matters Too
Unlike your stable kitchen oven, outdoor grilling means dealing with external factors that can significantly impact temperature control. You need to be more watchful. Keep these main players in mind:
- Wind: Can dramatically cool your grill or cause uneven heating.
- Ambient Temperature: Grilling in the cold requires more fuel and time than on a hot day.
- Humidity: High humidity can slow the drying of the food’s surface, affecting browning.
- Sunlight: A grill in direct sun will naturally get hotter inside.
- Rain: Can rapidly cool your grill down.
How to Maintain Stable Zones?
To keep temperatures steady in both zones, try these proven tips:
- Keep the Lid Closed: The lid traps heat and allows air circulation, just like an oven. Opening it unnecessarily can lower the temperature by 25-50°F (14-28°C) each time. Resist the temptation to peek!
- Control Airflow (Charcoal Grills): On charcoal grills, the vents are your temperature control. More air means a hotter fire; less air means a cooler fire. Learn how your bottom (intake) and top (exhaust) vents work together.
- Adjust As You Go: Grilling is dynamic. Be ready to make small adjustments to vents or burner settings during the cook.
- Practice: Mastering zones takes practice. A good target difference between your direct and indirect heat zones is typically around 150-200°F (85-110°C).
Two-Zone Grilling: Not Just for Meat!
When people think of grilling, steaks, ribs, and burgers usually come to mind. But the two-zone method opens up possibilities for a much wider variety of foods! Vegetables, fruits, and even desserts can undergo a true transformation on the grill using both heat zones.
The Secret to Perfectly Grilled Vegetables
Grilled vegetables can be much more than a side dish – they can steal the show! Grilling brings out incredible flavors and textures.
- Sweet Corn: A summer classic. When fresh corn hits the hot grate, its natural sugars caramelize, developing a deep sweetness impossible to achieve by boiling. Starch also converts to simpler sugars, enhancing the sweetness further. The secret? Two zones! Start indirect to let the kernels cook through and concentrate flavor. Once they soften and turn golden, move the cobs briefly over direct heat for those beautiful char marks and that wonderful, nutty grilled corn aroma.
- Bell Peppers: They transform differently. Over direct heat, the skin quickly blackens and blisters (this is intentional!). The high heat breaks down fiber and caramelizes sugars, creating a deep, sweet, slightly smoky flavor. Moved to the indirect zone, the pepper flesh gently softens without becoming mushy, intensifying its natural flavors.
- Eggplant: Often tricky due to its spongy texture that soaks up oil. The strategy? Start slices over direct heat to quickly sear the surface, creating a barrier that limits oil absorption. Then, move them to the indirect zone to let the heat gently cook the inside until it’s creamy and almost buttery, without needing excessive oil.
Nailing Skewers: The Two-Zone Solution
Skewers (shish kebabs) present a real challenge, combining ingredients with different cooking times and textures on one stick. This is where the two-zone method really shines. Imagine a classic skewer with chicken, peppers, onions, and mushrooms – each needs slightly different cooking. How to handle it?
- Start the skewers on the indirect heat side. This allows the chicken (which needs the longest time) and thicker vegetables to cook through gently and evenly without burning. The onion will start to soften and sweeten.
- When the chicken is almost cooked through, move the skewers over direct heat for just a few minutes per side. This gives all the ingredients those desirable charred edges and characteristic grill flavor, minimizing the risk of drying out delicate items like mushrooms.
Discover Grilled Fruits!
Grilling fruit might sound unusual, but it’s a fantastic way to make simple yet stunning desserts! The grill’s heat triggers changes that totally transform their flavor profile.
- Pineapple: Excellent for grilling due to its high sugar content. Over direct heat, the sugars caramelize rapidly, creating deep, rich notes that perfectly balance the fruit’s natural tartness. The heat also breaks down some acids, making it taste even sweeter.
- Peaches/Nectarines: Also spectacular on the grill! Halve them, place cut-side down over direct heat. They’ll develop an intense aroma and almost caramel-like sweetness as the heat softens the flesh. Once you achieve nice grill marks, you can briefly move them to indirect heat to warm through evenly.
Your Grill as a Complete Outdoor Kitchen
With two zones, your grill can function as a true outdoor kitchen, capable of preparing all elements of a meal. Instead of running back and forth, you can smartly use both zones. Imagine this dinner: steaks, grilled potatoes, corn on the cob, a grilled vegetable salad, and grilled peaches for dessert – all from the same grill! The key is planning. Here’s one possible workflow:
- Start potatoes on the indirect side (they take the longest).
- After a while, add corn cobs to the indirect side.
- When potatoes and corn are nearing doneness, place steaks over direct heat.
- While steaks are searing, perhaps move the potatoes briefly to direct heat for browning.
- Once steaks reach desired temperature, move them to the indirect side to rest (crucial!). Use the now-available direct heat space for quick-cooking salad vegetables (like peppers, zucchini).
- Give the corn a quick roll over direct heat for char marks.
- While guests are enjoying the main course, quickly grill the peaches over direct heat for an easy but impressive dessert.
How to Grill Different Types of Meat (Using Two Zones)?
Understanding how heat affects meat helps you plan the best approach:
- Steaks & Lean Meats (e.g., Pork Chops): Cook quickly and can dry out easily as they lack much collagen. The ‘reverse sear’ method is often best: start on the indirect side to gently raise the internal temp (e.g., to 122-131°F / 50-55°C). Then, move to the direct side for a short, hot sear to build a great crust and reach the final target temp (e.g., 135°F / 57°C for medium-rare steak).
- Tougher, Collagen-Rich Meats (Ribs, Chuck Roast, Brisket, Pork Shoulder): Need collagen breakdown to become tender, but long cooks can dry them out. The answer is low and slow cooking almost entirely on the indirect side (aim for a grill temp of 225-275°F / 107-135°C) for several hours, until the internal temp hits around 195-203°F (90-95°C). This gives collagen ample time to convert to gelatin.
- Bone-In Poultry (Chicken pieces, whole birds): Different parts cook at different rates, and you want crispy skin. A good strategy: cook mainly on the indirect side until the thickest part reaches a safe internal temp (160-165°F / 71-74°C, avoiding bone). Then, briefly move it over direct heat, skin-side down, at the very end to crisp the skin perfectly.
Advanced Temperature Control Techniques
Once you’re comfortable with the basics, you can try a few more tricks:
- Water Pan: Placing a pan of water in the indirect zone adds moisture to the grill environment (great for long cooks) and helps stabilize the temperature by absorbing excess heat.
- Snake Method (Charcoal): For very long, low-temp cooks on a charcoal grill, arrange unlit coals/briquettes in a C-shape or ‘snake’ along the edge, lighting only one end. They’ll burn slowly along the chain, providing steady low heat for hours. (Definitely a topic for its own article!)
- Heat Sinks: Adding materials that hold heat well, like fire bricks or a thick steel plate, on the grate can help distribute heat more evenly and minimize temperature swings.
The Road to Mastery
Ultimately, mastering two-zone grilling comes down to practice and experimentation. Over time, you’ll start to get a feel for which foods benefit most from a quick, hot cook versus a gentler, longer approach. You’ll understand how factors like humidity, food density, and sugar content affect cooking on the grill. Keeping a simple grilling journal – noting weather, fuel, temps, times, vent settings, and the final results – can really speed up your learning curve.
You’ll discover that two-zone grilling is more than just a technique; it’s a way of thinking about cooking that gives you full control. It’s a skill that elevates everyday grilling, whether you’re cooking meat, vegetables, or even fruit. It provides flexibility and builds confidence.
Whether you’re making a simple weeknight meal or hosting a big holiday feast, understanding and using this method will transform your results. Start with simpler cooks, like chicken pieces or thicker steaks. As you gain confidence, tackle more challenging items like whole poultry, large roasts, or delicate seafood. With each grilling session, you’ll develop the intuition that separates the casual griller from a true backyard chef.
Remember, great grilling blends science, art, and practice. The two-zone method provides the foundation – your creativity and experience will build upon it to create memorable meals for years to come.